Whenever you upload a video to YouTube, it automatically creates an auto caption track within a few minutes. (Note: Autocaptions are not produced for really long videos. Just another not to create really long videos!) In February, YouTube announced there were 1 billion autocaptioned videos. The voice recognition software behind auto captioning is continuously improving but my experience watching YouTube videos includes encountering F-bombs, hateful language towards race, gender, and sexuality, and other things that make no sense within auto-captions. Some of the most egregious errors have been thankfully decreasing over the last few months but as a creator putting your work online and sharing it with others, it's important to edit the auto captions and check their accuracy. Publishing these edits will not only create accessibility and make YouTube a friendlier place for people who rely on captions, it will also help get your content noticed as the transcripts created with published captions are indexed by search engines. If your students are posting content on YouTube this is a great lesson for them so that hateful language doesn't become part of their digital legacy.
How to Create Accessibility
Prerequisite: Video on YouTube. If you create a video for this purpose, I recommend creating one less than a minute to begin your captioning practice.
- Visit your YouTube Video Manager and Choose a Video to caption. If you are new to captioning, I recommend selecting the shortest video on your channel. If you have been following along with the challenge, you might choose your video with the most views.
- Edit > Subtitles & CC
- Choose [insert language] (Automatic)
- Edit
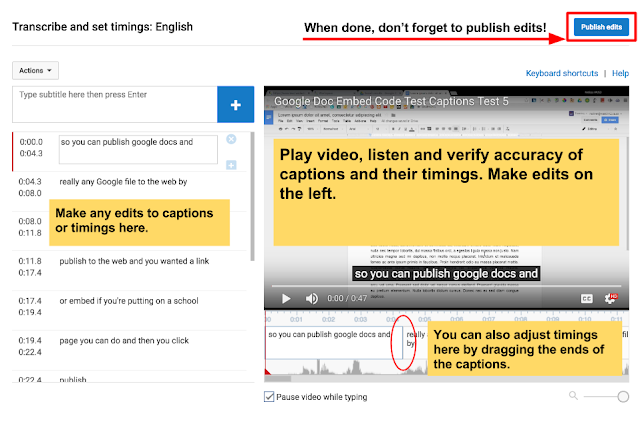
- Play your video, check for accuracy and make any necessary edits for content or timings. Make content edits on the left. Timing edits are easier done using the sliders on the bottom of your video
- Click Publish Edits when finished.


No comments